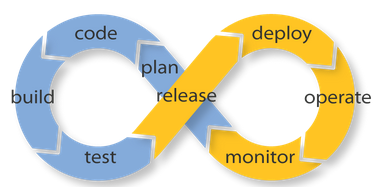
The DevOps Environment
At some point in beginning of the retrofit I had freed up our old production equipment. I brought it all back to office and kept the two most powerful servers (HP ProLiant G5) to repurpose as my official test and dev environment. I did also purchase a NAS device so I could have some reliable shared storage. With the two servers I loaded up Xen Server and created a Virtual Sever Environment to start loading up VMs. This is what I ended up with in this environment.
- Build Server (Jenkins)
- Three Build Slaves (Linux Jenkins Slaves)
- Archive Repository (Apache Archiva)
- Code Repository (Git – Atlassian Stash)
- Project Management Tool (Atlassian Jira w/ Greenhopper)
- Wiki (Atlassian Confluence)
- Test Database (MySQL)
- Four Application Servers (Linux/Java/Tomcat and/or Glassfish)
Later on I added a Ubuntu linux Workstation VM so I could use it as linux desktop.
How does this work
So this like a lot of machines with a lot of things going on, and it is. I will try to explain the roles of the servers by explaining how my development and deployment pipeline works. Below is the workflow of a company requested feature with some of the DevOps processes mixed in
Step 1. PM (Project Manager) Inserts Enhancement Story in Jira – Story marked as DEMO-127. At some point in the future this store gets prioritized into a sprint.
Step 2. Sprint with DEMO-127 starts. Dev assigns DEMO-127 to them self and has Jira create a branch in Git
Step 3. Dev fires up Intellij checks out the DEMO-127 Branch. Works on the story
Step 4. Dev completes story checks into repo with a comment that contains DEMO-127
Step 5. Dev pushes branch and merges back into the “develop” branch
Step 6. Jenkins Builds develop branch. Adds a comment into Jira. Starts with a quick compile job then moves to testing jobs. It farms out work to build slaves.
Step 7. Everything passes, Its decided that this is releasable.
Step 8. Run the Master build which merges develop into master and pushes out to production.
Test Automation
My team does not have any full time testers. We just have people that try out the latest features, usually its something they have requested. So I write all of the tests. And I do everything with JUnit. I have three different types of tests as described below.
Unit tests: I write JUnits – pretty simple, seen one seen them all kinda of a thing.
Integration Tests: I use JUnits and the Spring Testing framework. This can auto-wire in all of the needed services and configurations. These tests will bring up the Spring context and can actually hit the database. These tests usually add their own data. So they will start by creating all of the needed data for running the test. Without relying on any seed data to be present.
GUI Tests: Still use JUnits. However these JUnits drives Selenium Page Objects.
Why use JUnits for the base of everything? Because the results are pretty much a standard that a lot of tools will understand out of the box. I would say that these technologies are replaceable, especially if you have testers that don’t write in Java, however it needs to be something that the build server understands.
In the next article we will explore the production environment.
